

Pan-Fried Chicken Tenders: Crispy, Juicy & Easy in 15 Minutes
Sometimes chicken tenders look almost done, yet the center stays stubbornly undercooked. Pan-fried chicken tenders solve that problem with a hot skillet, a little oil, and a few minutes of attention.
Why These Pan-Fried Chicken Tenders Work
The frustrating part is usually the outside. It browns quickly while the inside needs more time. I have made that mistake myself, turning the heat down too late and ending up with chicken that looked great but lacked that juicy texture.
The trick is simpler than it seems. Keep the tenders similar in thickness, use moderate heat, and avoid crowding the pan.
This gives you chicken tenderloins pan-fried until golden on the outside and tender inside.
Ingredients
- 1 lb chicken tenderloins
- 2 tablespoons olive oil
- 1 teaspoon paprika
- 1 teaspoon garlic powder
- 1/2 teaspoon onion powder
- 1/2 teaspoon salt
- 1/4 teaspoon black pepper
- 1/4 cup all-purpose flour
- 1 tablespoon grated Parmesan, optional
The chicken provides protein, while olive oil supplies mostly unsaturated fat. Harvard’s Nutrition Source recommends plant oils such as olive and canola oil as healthier cooking fat choices.
How to Pan-Fry Chicken Tenders

When you pan-fry chicken tenders, the goal is steady heat rather than maximum heat.
- Pat the chicken dry with paper towels.
- Mix the flour, paprika, garlic powder, onion powder, salt, pepper, and Parmesan.
- Coat each tender lightly in the seasoned mixture.
- Heat the olive oil in a large skillet over medium heat.
- Add the chicken without overlapping the pieces.
- Cook for about 3 to 5 minutes on the first side.
- Turn and cook another 3 to 5 minutes.
- Check the thickest tender with an instant-read thermometer.
- Remove the chicken when it reaches 165°F internally.
- Let it rest for 2 to 3 minutes before serving.
If you’re wondering how to cook chicken tenders in a frying pan, this is the part that matters most: don’t judge doneness by color alone. USDA FSIS recommends cooking poultry to a minimum internal temperature of 165°F (73.9°C), measured with a food thermometer.
How Long to Fry Chicken Tenders in a Pan?

The exact answer depends on thickness. Thin tenders may finish quickly, while thicker pieces need more time.
| Chicken thickness | Approx. pan time | Heat | Safe internal temperature |
| 1/2 inch | 3 to 4 min/side | Medium | 165°F |
| 3/4 inch | 4 to 5 min/side | Medium | 165°F |
| 1 inch | 5 to 6 min/side | Medium-low | 165°F |
So, how long to cook chicken tenders on a pan? Usually around 6 to 12 minutes total, depending on thickness and your skillet.
For another way to estimate chicken cooking times, you can use our chicken cooking time calculator.
How to Get Crispy Chicken Tenders

The coating needs contact with the hot pan. That’s why overcrowding causes trouble.
For crispier chicken tenders in a frying pan, try these small adjustments:
- Pat the chicken dry before coating.
- Use just enough flour to create a thin layer.
- Preheat the skillet before adding chicken.
- Leave space between each tender.
- Turn the chicken only once if possible.
- Keep the heat around medium rather than blasting it.
If you want a different cut cooked in the same style, our easy pan-fried chicken breast recipe uses the same basic stovetop approach.
Can You Pan Fry Chicken Tenders Without Breading?
Yes. Can I pan-fry chicken tenders without breading? Absolutely.
Skip the flour mixture, season the chicken directly, and cook it in a lightly oiled skillet. The result will be less crispy but still tender and flavorful.
For a completely different cut, you can also try our pan-fried chicken thighs.
Are Chicken Tenders Healthy?
Chicken tenderloins are a convenient source of lean protein. The overall nutrition of the dish depends heavily on the coating, oil, portion size, and what you serve alongside it.
Using olive oil instead of large amounts of butter can increase the proportion of unsaturated fat in the meal. Harvard’s Nutrition Source notes that replacing saturated fats with unsaturated fats can support a healthier dietary pattern.
For a balanced plate, serve the tenders with vegetables, salad, or another minimally processed side.
Food Safety Tips
Raw chicken deserves a little caution.
- Wash your hands after handling raw chicken.
- Keep raw chicken separate from ready-to-eat foods.
- Don’t rinse raw chicken because splashing can spread bacteria around your kitchen.
- Use a clean plate for cooked chicken.
- Check the thickest part with a food thermometer.
- Cook poultry to 165°F.
- Refrigerate leftovers within 2 hours.
The USDA specifically recommends separating raw poultry from other foods and cooking poultry to 165°F.
Some Benefits of This Meal Ingredients
1. High-Protein, Lean Profile (Chicken Tenderloins)
- FoodData Central verifies that boneless, skinless chicken breast meat (the cut from which tenderloins are derived) is exceptionally lean. [1]
- The Evidence: According to USDA FoodData standards, a standard 100-gram serving of cooked skinless chicken breast provides roughly 31 grams of protein and only 3.6 grams of fat. This confirms our calculation that a 1 lb (raw) recipe yields over 100 grams of high-quality, complete lean protein.
2 Cardiovascular Benefits (Olive Oil)
- as mentioned by PubMed Central this recipe has multiple benifits for heart.
3 Micronutrients & Brain Health (B-Vitamins & Minerals)
- Chicken meat naturally contains high levels of Niacin (Vitamin B3) and Vitamin B6. Clinical standards from the NIH confirm that Vitamin B6 is essential for protein metabolism, cognitive/brain development, and immune function, while Niacin plays a direct role in turning macronutrients into cellular energy. [1, 2]
4. Anti-Inflammatory Compounds (Spices)
- Research by PubMed and other biomedical databases notes that allium vegetables (garlic and onion) contain allicin, and red peppers (paprika) contain capsaicin. These bioactive components act as natural antioxidants that scavenge free radicals, bolster immune system resistance, and reduce systemic inflammation
Final Thoughts
Good pan-fried chicken tenders don’t require complicated techniques. Keep the pieces similar in thickness, control the heat, leave space in the skillet, and check the center before serving.
Once you stop chasing the clock and start watching the temperature, the whole process becomes much easier.
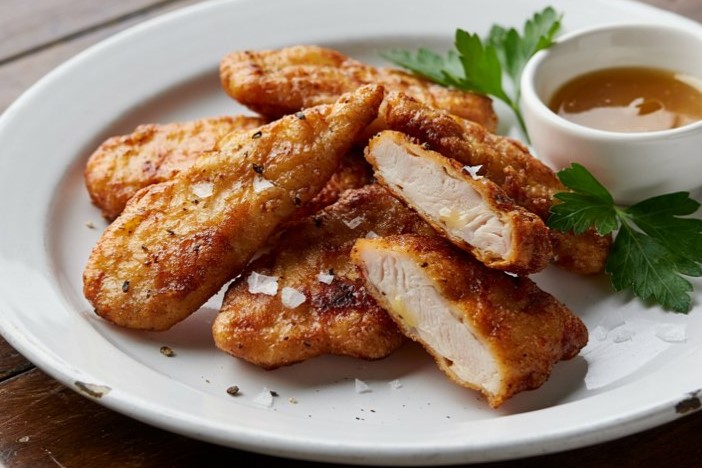
Pan-Fried Chicken Tenders: Crispy, Juicy & Easy in 15 Minutes
Ingredients
Equipment
Method
- Pat the chicken tenderloins dry with paper towels. This helps the flour coating adhere and encourages better browning.
- In a shallow bowl, combine the flour, paprika, garlic powder, onion powder, salt, black pepper, and optional Parmesan.
- Coat each chicken tenderloin lightly with the seasoned flour. Shake off any excess.
- Heat the olive oil in a large skillet over medium heat.
- Once the oil is hot, carefully place the chicken tenders in a single layer. Leave enough space between them so they brown instead of steaming.
- Cook for about 4 to 5 minutes on the first side. Turn and cook for another 3 to 5 minutes, depending on thickness.
- Check the thickest tender with an instant-read thermometer. The chicken should reach 165°F (74°C) internally.
- Transfer the cooked chicken to a clean plate and let it rest for about 3 minutes before serving.
Notes
FAQ
How do you fry chicken tenders in a pan?
Heat a lightly oiled skillet over medium heat. Season or bread the tenders, then cook them for about 3 to 5 minutes per side, depending on thickness. Verify 165°F in the center.
How long do I fry raw chicken tenders for?
Most average-size tenders take roughly 6 to 12 minutes total. Thickness matters more than the clock, so use a thermometer to confirm 165°F.
Can I pan-fry chicken tenders without breading?
Yes. Season the chicken and cook it directly in a lightly oiled skillet. It will be less crispy but can remain juicy.
What’s the secret to crispy chicken tenders?
Dry the chicken first, use a light coating, preheat the skillet, and avoid overcrowding. Too many pieces lower the pan temperature and can soften the coating.
Is 20 minutes enough to fry chicken?
For chicken tenders, 20 minutes is usually more than enough for cooking and preparation. However, don’t rely on time alone. The USDA recommends checking poultry with a thermometer and reaching 165°F.


